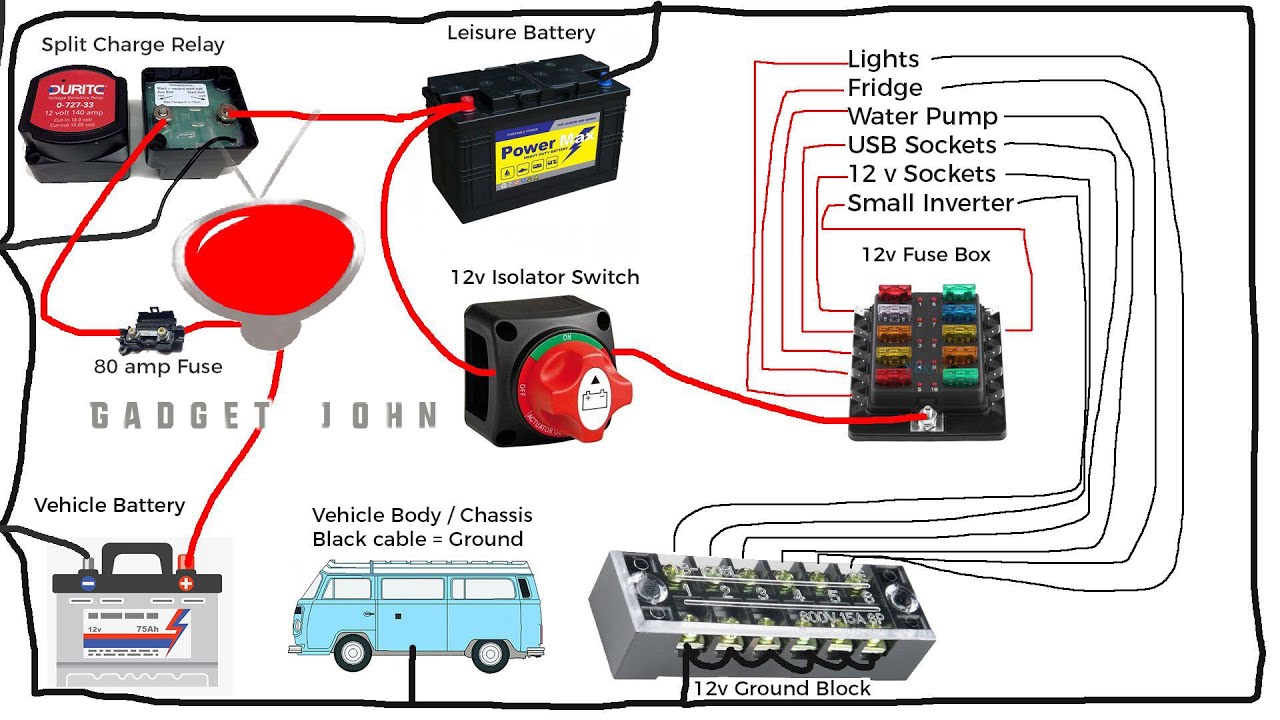
Battery switch on travel trailer function is crucial for safe and efficient RV power management. Understanding how your battery switch works is key to preventing electrical issues and maximizing your travel trailer’s battery life. This guide breaks down the different types of switches, their functions, and how to maintain them, ensuring smooth sailing on your next adventure.
We’ll explore various switch types, from simple single-pole switches to more complex double-pole double-throw models, outlining their pros and cons and helping you choose the best option for your setup. We’ll also cover safe connection and disconnection procedures, troubleshooting common problems, and integrating your battery switch with solar panels and inverters. Get ready to become a battery switch expert!
Types of Battery Switches in Travel Trailers: Battery Switch On Travel Trailer Function
Choosing the right battery switch for your travel trailer is crucial for managing your power sources effectively and safely. Different types of switches offer varying levels of control and protection, each with its own set of advantages and disadvantages. Understanding these differences will help you select the best option for your needs.
Single-Pole Battery Switches
Single-pole switches are the simplest type, offering a single on/off function for a single battery. They’re essentially a simple disconnect switch, preventing current flow to the battery’s output terminals when turned off. This provides basic protection against accidental shorts or draining the battery when not in use. They are usually inexpensive and easy to install. However, they lack the sophistication to manage multiple batteries or complex power systems.
Double-Pole Battery Switches
Double-pole switches control both positive and negative terminals of a single battery simultaneously. This offers improved safety compared to single-pole switches, as both terminals are disconnected at the same time, reducing the risk of accidental shorts or electrical shocks. They’re still relatively simple to use and install, making them a popular choice for many RVers. The downside is that they, like single-pole switches, still only manage one battery.
Double-Pole Double-Throw (DPDT) Battery Switches, Battery switch on travel trailer function
DPDT switches offer more advanced control, allowing you to switch between two different batteries (like a house battery and a starting battery) or to disconnect both completely. This is particularly useful for managing multiple batteries in larger travel trailers or for those who want to isolate their house battery from the starting battery when not in use to prevent deep discharge.
So, you’re an audiophile who travels? Awesome! Check out this guide on building the perfect audiophile travel setup for pristine sound on the go. It covers everything from portable DACs to noise-canceling headphones. Then, if you’re looking for luxury options, explore the high-end gear showcased in this other amazing resource on audiophile travel setups – perfect for those who want the best of the best, even while traveling.
While offering greater flexibility, they are generally more expensive and complex to install than simpler switches.
Comparison of Battery Switch Types
| Feature | Single-Pole | Double-Pole | Double-Pole Double-Throw (DPDT) |
|---|---|---|---|
| Number of Batteries Controlled | One | One | Two (or ability to disconnect both) |
| Safety | Lower (only one terminal disconnected) | Higher (both terminals disconnected) | High (both terminals disconnected for each battery, or complete disconnection) |
| Complexity | Low | Low to Moderate | Moderate to High |
| Cost | Low | Moderate | High |
| Application Suitability | Small trailers, simple systems | Most trailers, improved safety needed | Larger trailers, multiple batteries, advanced control needed |
Function and Purpose of a Battery Switch
A battery switch is a crucial component in a travel trailer’s electrical system, acting as a gatekeeper for power flow between your various batteries. It allows you to control which batteries are providing power and helps prevent accidental drain or damage to your system. Understanding its function is key to maintaining your RV’s electrical health and avoiding costly repairs.The primary function of a battery switch is to isolate the house batteries (used for interior lights, appliances, and other 12V systems) from the chassis battery (used to start the tow vehicle’s engine).
This isolation is important for several reasons. Without the switch, your house batteries could potentially drain the chassis battery, leaving you stranded. Conversely, a faulty chassis battery could potentially damage your house battery bank. The switch provides a simple on/off mechanism to prevent these scenarios.
Battery Isolation and Prevention of Cross-Battery Drain
A properly functioning battery switch ensures that when you’re not using the travel trailer, the house batteries are completely disconnected from the chassis battery. This prevents parasitic drain, a slow but steady depletion of the house batteries caused by small electrical draws from things like clocks or detectors, even when the trailer is not connected to shore power. This isolation is particularly important for extended storage periods.
Safety Implications of Proper Battery Switch Usage
Improper use of a battery switch can lead to several safety hazards. For example, accidentally leaving the house batteries connected to a faulty chassis battery could lead to a rapid discharge and potential damage to both batteries. Additionally, incorrect switching could create dangerous electrical shorts or sparks, posing a fire risk. Always ensure the switch is in the correct position before connecting to shore power or using any appliances.
Diagram of Electricity Flow
Imagine a simple diagram. We have three key components: the chassis battery, the house batteries, and the load (e.g., interior lights). A battery switch sits between the house batteries and the load. With the battery switch OFF: The house batteries are completely isolated. Electricity cannot flow from the house batteries to the load.
The chassis battery remains unaffected and powers only the vehicle’s starting system. With the battery switch ON: The house batteries are connected to the load. Electricity flows from the house batteries to power the lights and appliances. The chassis battery remains isolated from the house battery bank unless a specific configuration (like a combination switch) is used. This configuration allows charging of both batteries simultaneously when connected to shore power or a generator.
Connecting and Disconnecting Batteries

Connecting and disconnecting your travel trailer batteries using a battery switch is a straightforward process, but safety is paramount. Improper handling can lead to sparks, short circuits, and even injury. Following these steps will ensure a safe and efficient connection or disconnection every time.
The battery switch acts as a central control point, allowing you to isolate or connect your batteries to the trailer’s electrical system. This is crucial for preventing accidental drain on your house batteries when not in use, and for safely working on the electrical system without risk of short circuits.
Battery Connection Procedure
Before beginning, always ensure the battery switch is in the “OFF” position. This prevents accidental connection and potential hazards. Proper grounding and secure cable connections are essential for preventing voltage drops and ensuring the safety of your electrical system.
- Inspect the battery terminals for corrosion. Clean them thoroughly with a wire brush if necessary.
- Connect the negative (-) cable to the negative (-) terminal of the battery first. Secure the connection tightly. This minimizes the risk of accidental short circuits during the connection process.
- Connect the positive (+) cable to the positive (+) terminal of the battery. Again, ensure the connection is secure.
- Carefully move the battery switch to the “ON” position. This connects the batteries to the trailer’s electrical system.
- Check your trailer’s electrical system to confirm power is restored. Check lights, appliances, etc.
Battery Disconnection Procedure
Disconnecting your batteries is equally important, especially before any maintenance or storage. The order of disconnection is the reverse of connection, ensuring safety and preventing accidental sparks or short circuits.
- Turn the battery switch to the “OFF” position. This isolates the batteries from the trailer’s electrical system.
- Disconnect the positive (+) cable from the positive (+) terminal of the battery first.
- Disconnect the negative (-) cable from the negative (-) terminal of the battery.
Grounding and Cable Connections
Proper grounding is vital for the safe and efficient operation of your travel trailer’s electrical system. A poor ground connection can lead to voltage fluctuations, damage to electrical components, and even fire hazards. Similarly, loose or corroded cable connections can lead to resistance, overheating, and failure of the system.
- Use appropriately sized cables for the amperage of your batteries and electrical system. Undersized cables can overheat and pose a fire risk.
- Ensure all cable connections are clean, tight, and corrosion-free. Use appropriate anti-corrosion compounds if necessary.
- Verify that the ground wire from your battery is securely connected to a clean, unpainted metal surface on your trailer chassis.
Safety Precautions During Battery Connection and Disconnection
Working with batteries involves potential hazards. Following these precautions will minimize risks and ensure a safe operation.
So, you’re an audiophile who travels? Awesome! Check out this guide on creating the perfect audiophile travel setup for those amazing on-the-go listening experiences. It covers everything from portable DACs to noise-cancelling headphones. But if luxury’s your thing, then you absolutely need to see what’s in store at audiophile travel aetup ; they’ve got some seriously high-end gear for the discerning traveler.
Seriously, elevate your listening game wherever you roam!
- Wear safety glasses to protect your eyes from potential sparks or acid splashes.
- Wear gloves to protect your hands from acid and corrosion.
- Have baking soda and water readily available to neutralize any spilled battery acid.
- Never allow metal tools to touch both battery terminals simultaneously; this could cause a short circuit.
- Work in a well-ventilated area to avoid inhaling potentially harmful battery gases.
Potential Problems and Troubleshooting
If your battery switch fails to operate correctly, several issues could be at play. Systematic troubleshooting can help identify the problem.
- Problem: Switch does not turn. Troubleshooting: Check the switch for any physical obstructions or damage. Ensure the switch is properly wired.
- Problem: Switch turns, but no power. Troubleshooting: Check the battery connections for corrosion or looseness. Inspect fuses and circuit breakers in the trailer’s electrical system.
- Problem: Intermittent power. Troubleshooting: Inspect all wiring for damage or loose connections. Check for corrosion on battery terminals and cable connectors. Consider replacing the switch if problems persist.
- Problem: Excessive heat at the switch. Troubleshooting: This indicates a high current draw or a short circuit. Immediately turn off the switch and inspect the wiring for damage. Consult a qualified technician.
Battery Switch Maintenance and Troubleshooting
Keeping your travel trailer’s battery switch in good working order is crucial for reliable power. Regular maintenance prevents problems and ensures your batteries are properly managed, extending their lifespan and avoiding frustrating breakdowns on the road. Neglecting maintenance can lead to costly repairs or even stranded trips.Regular maintenance of your battery switch is straightforward and doesn’t require specialized tools.
A simple inspection and occasional cleaning can significantly extend the life and reliability of your switch, preventing more serious issues down the line.
Regular Maintenance Schedule
A simple visual inspection should be part of your pre-trip checklist. This includes checking for corrosion around the terminals and loose connections. Cleaning the terminals with a wire brush and applying a corrosion inhibitor will help maintain conductivity. Consider a more thorough cleaning every six months or annually, depending on your usage and environmental conditions (e.g., coastal areas experience higher corrosion).
Common Problems and Their Causes
Several issues can arise with battery switches. A switch that won’t turn might be due to a seized mechanism from corrosion, a broken internal component, or even a simple problem like a stuck switch lever. Sparking indicates a more serious problem, potentially involving loose connections, damaged wiring, or a failing switch itself. Poor connections can also lead to voltage drops, reducing the power available to your appliances.
Troubleshooting Steps
| Problem | Possible Cause | Troubleshooting Steps | Safety Precautions |
|---|---|---|---|
| Switch won’t turn | Corrosion, seized mechanism, broken internal component | Clean terminals, lubricate the switch mechanism (if accessible), inspect for broken parts. If the problem persists, replacement may be necessary. | Always disconnect the batteries before working on the switch. |
| Sparking at the switch | Loose connections, damaged wiring, failing switch | Tighten all connections, inspect wiring for damage. If sparking persists, replace the switch immediately. | Wear safety glasses and gloves. Disconnect the batteries immediately if sparking occurs. |
| Low voltage at appliances | Poor connections, corroded terminals | Clean and tighten all connections. Check for corrosion and clean or replace terminals as needed. | Disconnect batteries before cleaning terminals. |
Maintenance Procedure Frequency
| Procedure | Frequency | Description | Notes |
|---|---|---|---|
| Visual Inspection | Before each trip | Check for loose connections, corrosion, or damage. | Quick and easy check. |
| Terminal Cleaning | Every 6 months | Clean terminals with a wire brush and apply corrosion inhibitor. | More frequent cleaning may be needed in harsh environments. |
| Full Switch Inspection | Annually | Thorough inspection of the switch mechanism for any signs of wear or damage. | May require professional assistance. |
Battery Switch and Solar Panel Integration
Integrating a battery switch with your solar panel charging system offers significant control and safety benefits for your travel trailer’s electrical system. It allows you to selectively disconnect parts of the system for maintenance, troubleshooting, or in emergency situations, preventing accidental shorts or overloads. Understanding this integration is crucial for safe and efficient power management.Properly integrating a battery switch with solar panels ensures that you can manage the flow of power from your solar panels to your batteries effectively.
This control is essential for both normal operation and during maintenance or repairs.
Solar Panel Isolation for Maintenance
Isolating your solar panels using the battery switch is a critical safety precaution before performing any maintenance on the panels, wiring, or charge controller. By disconnecting the panels from the battery bank via the switch, you eliminate the risk of electric shock or damage to sensitive components. This is particularly important when working on the solar panels themselves or their connecting wires, which can carry potentially dangerous voltages.
Simply flipping the battery switch to the “off” position effectively cuts the power flow from the panels.
Wiring a Battery Switch into a Solar Panel System
Wiring a battery switch into a system with solar panels and a battery charger requires careful planning and adherence to safety standards. The switch should be installed in the positive (+) cable path between the solar panels/charge controller and the battery bank. Never place the switch in the negative (-) cable. Incorrect placement can lead to dangerous situations.
All connections should be secure and properly insulated to prevent short circuits. Using appropriately sized wiring for the amperage of your system is essential.
Typical Wiring Diagram: Battery Switch, Solar Panels, and Battery Charger
Imagine a diagram showing the following:A set of solar panels connected to a solar charge controller. The positive (+) output wire from the charge controller runs to the input terminal of a battery switch (e.g., a 1-2-Both switch). The output terminal of the battery switch connects to the positive (+) terminal of the battery bank (house batteries). A separate battery charger is connected to the battery bank, also via its own positive (+) and negative (-) cables.
The negative (-) cables from the solar panels, charge controller, and battery charger all connect directly to the negative (-) terminal of the battery bank. A fuse or circuit breaker should be included in the positive (+) line before the battery switch as an added safety measure. This setup allows the battery switch to control the flow of power from the solar panels to the batteries, while the battery charger continues to charge independently.
The switch is the primary means of isolating the solar panel system from the batteries. All connections should be clearly labeled.
Battery Switch and Inverter Interaction
Your travel trailer’s battery switch and inverter work together to manage power, but understanding their relationship is key to preventing problems and maximizing your off-grid capabilities. The battery switch acts as a gatekeeper, controlling which batteries power the inverter and other 12V systems. The inverter itself converts 12V DC power from your batteries into 120V AC power for running household appliances.The battery switch can directly control power flow to the inverter by simply turning the switch to the “on” position for the battery bank connected to the inverter.
This establishes the electrical pathway for the inverter to draw power. Switching the battery bank to “off” effectively isolates the inverter from the batteries, preventing it from drawing power. This isolation is crucial for various reasons.
Situations Requiring Inverter Isolation
Using the battery switch to isolate the inverter is essential in several scenarios. For example, if you suspect a problem with the inverter itself, disconnecting it from the batteries prevents potential damage to the inverter or the battery bank. Similarly, isolating the inverter when not in use conserves battery power, as even a standby inverter draws a small amount of current.
Finally, disconnecting the inverter helps prevent accidental discharge of your batteries, particularly important if you leave your trailer unattended for an extended period.
Inverter Power Draw: Battery Switch Engaged vs. Disengaged
The impact of the battery switch on inverter power draw is significant. When the battery switch is engaged, the inverter draws power directly from the batteries as needed. However, when disengaged, the inverter cannot draw power and thus consumes zero amps from the battery bank. This is a crucial difference, especially for conserving battery life during extended periods of off-grid use.
| Battery Switch Status | Inverter Power Draw (Amps) | Notes |
|---|---|---|
| Engaged (On) | Variable (depends on load) | Can range from a few amps (idle) to several hundred amps (high load) |
| Disengaged (Off) | 0 Amps | No power is drawn from the batteries. |
Mastering your travel trailer’s battery switch is about more than just flipping a switch; it’s about ensuring the safety and longevity of your electrical system. By understanding the different switch types, their functions, and maintenance requirements, you can prevent costly repairs and enjoy worry-free power on the road. So, familiarize yourself with your switch, perform regular checks, and embrace the freedom of reliable RV power!
Questions and Answers
What happens if my battery switch is faulty?
A faulty switch can lead to power loss, electrical shorts, or even battery damage. It’s crucial to address any issues promptly.
How often should I check my battery switch?
Regular visual inspections (monthly) for corrosion and loose connections are recommended. A more thorough check (annually) should include testing the switch’s functionality.
Can I use a battery switch with lithium batteries?
Yes, but ensure the switch is compatible with the higher voltage and current demands of lithium batteries. Consult your battery and switch manuals.
My battery switch is sparking. What should I do?
Immediately disconnect the batteries and contact a qualified RV technician. Sparking indicates a serious electrical problem.
